Eisen's Blog
Spring Security Jwt 的实现
2021 April-12
突然发现除了跨域问题之外从来没有好好记录过 Spring Security 的其他内容。最近也是比较系统的看了些资料,这里就算是做一个总结吧,方便后面忘记了回看。
这里只介绍怎么把 jwt 的流程跑通以及对关键的代码做解释,不涉及 Authorization 部分,同时也只有 username password 单一的 authentication 流程,不涉及其他。
关键概念解释
首先要明白 spring security 主要通过 filter 拦截请求并做处理的,在 有关 servlet 和 filter 的基础知识 已经做了介绍。
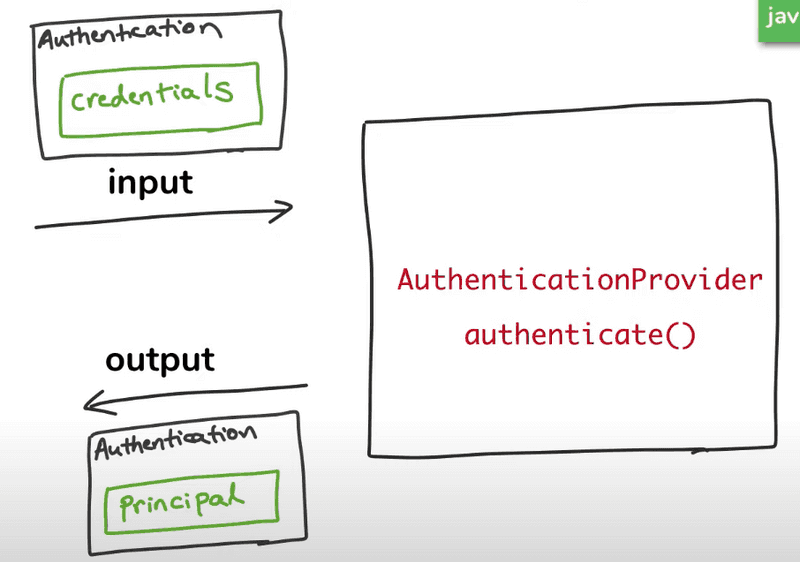
在 Spring Security 有一个概念 Authentication 它同时记录了一个用户授权的凭证(Credentials)以及验证通过后的产物(Principal)。而负责这个凭据验证并基于 Principal 的东西就是 AuthenticationProvider。
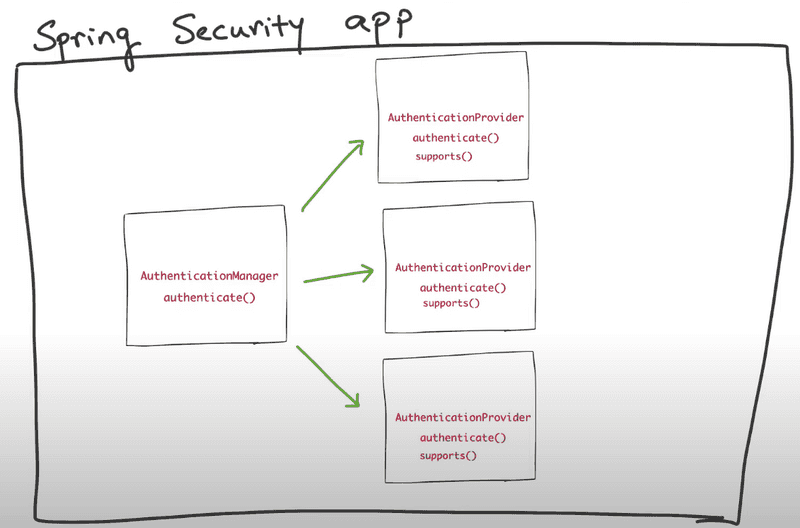
然后一个系统可能会支持多种凭据,比如最典型的 UsernamePasswordAuthentication 也可以是通过 OAuth 的 Authentication。为了处理不同的授权流程,Spring Security 有另外一个概念 AuthenticationManager 用于管理多个 AuthenticationProvider:
而具体到我们这次要构建的 JwtUsernamePassword 的流程,当我们登录的时候需要拿着登录信息(username + password)去数据库(或者其他地方)校验有没有这样子的组合,而这个地方 Spring Security 也抽取了概念叫做 UserDetailsService:
Spring Security 有提供一个名为 WebSecurityConfigurerAdapter 的基类,它已经提供了基本的框架,我们通常只需要对需要自定义的地方做覆盖即可。
那么总结下具体要做什么:
- 增加一个 InMemoryUserDetailsManager 假装是个数据库。
- 完成两个 Filter:
JwtUsernameAndPasswordAuthenticationFilter覆盖默认的UsernamePasswordAuthenticationFilter支持依据请求生成 jwt tokenJwtTokenVerifier检查请求的 headerAuthorization获取并验证所附带的 token 判断这个 token 是否合法并返回对应的 Principle
- 覆盖
WebSecurityConfigurerAdapter.configure把以上配置传起来
基本依赖
首先 gradle 依赖如下:
dependencies {
    implementation 'org.springframework.boot:spring-boot-starter-security'
    implementation 'org.springframework.boot:spring-boot-starter-validation'
    implementation 'org.springframework.boot:spring-boot-starter-web'
    compileOnly 'org.projectlombok:lombok'

    compile 'io.jsonwebtoken:jjwt-api:0.11.2'
    runtime 'io.jsonwebtoken:jjwt-impl:0.11.2',
            // Uncomment the next line if you want to use RSASSA-PSS (PS256, PS384, PS512) algorithms:
            //'org.bouncycastle:bcprov-jdk15on:1.60',
            'io.jsonwebtoken:jjwt-jackson:0.11.2' // or 'io.jsonwebtoken:jjwt-gson:0.11.2' for gson

    annotationProcessor 'org.springframework.boot:spring-boot-configuration-processor'
    annotationProcessor 'org.projectlombok:lombok'
    testImplementation 'org.springframework.boot:spring-boot-starter-test'
    testImplementation 'org.springframework.security:spring-security-test'
}
通过 start.spring.io 创建的项目,添加了以下依赖:
- web
- validation
- lombok
- spring security
同时增加了一个 jwt 解析的类库 jjwt。
WebSecurityConfig
增加一个 InMemoryUserDetailsManager,只有一个用户:
public class WebSecurityConfig extends WebSecurityConfigurerAdapter {
  ...

  @Override
  @Bean
  protected UserDetailsService userDetailsService() {
    return new InMemoryUserDetailsManager(
        new User("test", passwordEncoder.encode("password"), Arrays.asList("NORMAL")));
  }
}
覆盖 configure,增加上述提及的 Filter:
public class WebSecurityConfig extends WebSecurityConfigurerAdapter {
  @Override
  protected void configure(HttpSecurity http) throws Exception {
    http.csrf().disable() // disable csrf
        .sessionManagement().sessionCreationPolicy(SessionCreationPolicy.STATELESS) // 不再使用 cookie 管理 session
        .and()
        .addFilter(
            new JwtUsernameAndPasswordAuthenticationFilter(
                authenticationManager(), jwtConfig)) // 增加用户密码校验的 Filter
        .addFilterAfter(
            new JwtTokenVerifier(jwtConfig),
            JwtUsernameAndPasswordAuthenticationFilter.class) // 增加 token 校验的 Filter
        .authorizeRequests()
        .anyRequest().authenticated();
  }
}
JwtUsernameAndPasswordAuthenticationFilter
public class JwtUsernameAndPasswordAuthenticationFilter extends
    UsernamePasswordAuthenticationFilter {
  private AuthenticationManager authenticationManager;
  private JwtConfig jwtConfig;

  public JwtUsernameAndPasswordAuthenticationFilter(
      AuthenticationManager authenticationManager, // 1
      JwtConfig jwtConfig) {
    this.authenticationManager = authenticationManager;
    this.jwtConfig = jwtConfig;
  }

  @Override
  public Authentication attemptAuthentication(HttpServletRequest request,
      HttpServletResponse response) throws AuthenticationException { // 2
    try {
      UsernamePasswordRequest param = new ObjectMapper()
          .readValue(request.getInputStream(), UsernamePasswordRequest.class);

      Authentication authentication = new UsernamePasswordAuthenticationToken(
          param.getUsername(),
          param.getPassword()
      );
      return authenticationManager.authenticate(authentication);
    } catch (IOException io) {
      throw new RuntimeException();
    }
  }

  @Override
  protected void successfulAuthentication(HttpServletRequest request, HttpServletResponse response,
      FilterChain chain, Authentication authResult) throws IOException, ServletException { // 3
    String token = Jwts.builder()
        .setSubject(authResult.getName())
        .claim("authorities", authResult.getAuthorities().stream().map(
            GrantedAuthority::getAuthority).collect(toList()))
        .setIssuedAt(new Date())
        .setExpiration(java.sql.Date.valueOf(LocalDate.now().plusDays(jwtConfig.getDays())))
        .signWith(jwtConfig.getSecretKey())
        .compact();

    response.addHeader("Authorization", "Bearer " + token);
  }
}- 从
WebSecurityConfig那边获取的AuthenticationManager里面其实就是一个默认的UsernamePasswordProvider里面用的就是我们上文配置的InMemoryUserDetailsManager。 - 尝试验证,可以看到就是把
{"username": "username", "password": "password"}这种格式的 request body 做解析,然后让给AuthenticationManager。 - 生成 token,懂 jwt 的话就知道就是那么几个东西:
- subject 里面是 username
- claim 一些 key-value,这里塞了权限列表
- issueAt 创建时间
- expiration 过期时间
注意 其实很多时候这个 Filter 可能是一个独立的 Controller 会比较舒服一些吧,相比下文的 JwtVerifier 这个 Filter 基本就是强行复用了 Spring Security 的逻辑。
JwtTokenVerifier
public class JwtTokenVerifier extends OncePerRequestFilter {

  private JwtConfig jwtConfig;

  public JwtTokenVerifier(JwtConfig jwtConfig) {
    this.jwtConfig = jwtConfig;
  }

  public boolean isNullOrEmpty(String str) {
    return str == null || str.isEmpty();
  }

  @Override
  protected void doFilterInternal(
      HttpServletRequest request, HttpServletResponse response, FilterChain filterChain)
      throws ServletException, IOException {
    String authorizationHeader = request.getHeader("Authorization");

    if (isNullOrEmpty(authorizationHeader) || !authorizationHeader.startsWith("Bearer ")) {
      filterChain.doFilter(request, response);
      return;
    }

    String token = authorizationHeader.replace("Bearer ", "");

    try {
      Jws<Claims> claimsJws =
          Jwts.parserBuilder()
              .setSigningKey(jwtConfig.getSecretKey())
              .build()
              .parseClaimsJws(token);
      Claims body = claimsJws.getBody();
      String username = body.getSubject();
      List<String> authorities = (List<String>) body.get("authorities");
      Set<SimpleGrantedAuthority> simpleGrantedAuthorities =
          authorities.stream().map(SimpleGrantedAuthority::new).collect(Collectors.toSet());
      Authentication authentication =
          new UsernamePasswordAuthenticationToken(username, null, simpleGrantedAuthorities); // 1
      SecurityContextHolder.getContext().setAuthentication(authentication); // 2
    } catch (JwtException e) {
      throw new IllegalStateException(String.format("Token %s cannot be trusted", token));
    }

    filterChain.doFilter(request, response);
  }
}- 创建一个
UsernamePasswordAuthenticationToken注意,这里的第一个参数未必要 String 的,可以是任意类型的,这里只是一个 String 为例了 - 把
Authentication传递给SecurityContextHolder之后同一线程下就可以获取它并做进一步的权限验证了
参考资料
感觉最有用的就是这里的视频呢...
GraphQL Cursor 分页
2021 March-21
GraphQL 之前已经夸了不少了,见 REST vs GraphQL,确实在标准化方面远超 REST 了,这也是我想要切换到 GraphQL 的一大原因。不过 GraphQL 甚至连分页也提了一个标准,挺有意思的,看了看他们的 GraphQL Cursor Connections Specification ,想做一些自己理解的记录。
这样标准化的好处就是可以让前端也有一个类似的组件去处理分页,让这部分的工作就直接通过这个公共组件给覆盖了。想象一下,如果有更多的东西可以以这种方式形成标准,那相当于不少工作也就可以复用了呢?
分页这个东西虽然没有这样子如此明确的标准,但其实从各种文档、书籍、博客里也都逐渐形成了类似的标准了呢,毕竟这已经是一个非常古老的需求了。这里我就以最简单的方式介绍目前两种针对不同场景的分页风格,更多的信息可以从下文的参考中找的到。
两种分页方式
limit offset 分页
对于记录不多并且增删不频繁的场景,limit-offset 的方式基本是最健全的分页了。通过从数据库的 select * from xx limit xxx offset xxx 配合 select count(*) from xx 可以获取非常全面的分页信息以及动作:
- 一共多少页
- 当前是第几页
- 去下一页
- 去上一页
- 去第一页
- 去最后一页
但缺点也很明确:offset 这个语法对数据记录多的场景不友好,查询速度会明显下降,同时对快速变化的数据也不友好,很容易丢查询数据。
cursor limit 分页
cursor-limit 分页则是以类似于 select * from xxx where cursor < xxx order by cursor limit xx 的方式获取相对于 cursor 的记录。相对于 limit-offset 的方式会很难获取以下信息:
- 一共多少页
- 当前是第几页
- 去最后一页
graphql cursor connection 标准的一些细节
保留字段
GraphQL 定义凡事以 Connection 结尾的结构都遵循 Cursor Connection 的数据结构,并且名为 PageInfo 的东西都是 Cursor Connection 下的 PageInfo 结构。
查询参数
first after 与 last before 必须分组出现,也就是说可以是以下几种形式:
articles(first: Int!, after: String!)articles(last: Int!, before: String!)articles(first: Int, after: String, last: Int, before: String)
第三种就是同时支持正序和倒序查找,也就是支持向前翻页。
具体算法和实施
这里就按照 first after 为例子做介绍了,last before 都是反过来的,就不复读机了:
- 首先查询的时候按照
after + 1去查询,如果返回的个数为after + 1那就意味着有下一页(hasNextPage),否则就是没有。 - 如果还要考虑判断
hasPreviousPage那意味着每次都多一个查询select * from xxx where cursor < #{startCursor} limit 1,如果有结果就意味着返回true。 - 当然对很多自动加载下一页的场景就不考虑往前翻页了,这个就直接全部
false就好了。
最后
最近把 realworld-example-app 改写的差不多了,已经同时支持 GraphQL 和 REST 了,其中 GraphQL 部分的分页也是按照 cursor connection 的形式做的,然后我需要找个前端的 RealWorld 项目去对接下,看看我这个分页折腾的对不对了。
参考
如何让你的 web 站点存在 10 年以上
2021 March-07
看了一篇博客 A Manifesto for Preserving Content on the Web 介绍了如何设计 web 可以让你的信息更好的被存储下来,感觉很受启发,在这里对这篇文章的观点做一个介绍,也回顾一下自己这么多年来遇到的类似的问题,并且结合目前的技术栈说说自己的一些想法。
什么导致了 web 内容不能长久
这篇博客的作者发现自己之前保存的各种 bookmark 都已经失效了,然后回想自己七年前发布的文章里所包含的 demo 链接已经成了奇奇怪怪的广告页面。于是开始考虑在经历了这么多年的 web 发展之后如何设计 web 内容可以让它支撑 10 年之久。
任何网站都是需要维护的,内容需要更新,域名需要续费,机器节点需要付钱。但是人的兴趣是会慢慢转移的,也许在某一个账单将要失效或者网页因为某个依赖崩掉而无法打开的时候,你就觉得要不算了,这东西打不开也没关系,然后你所维护的网站就消失了。我自己曾经也拥有多个域名,但是相当多内容都已经消失了呢。
然后 web 的技术栈一直在变化,从 jquery 的出现,到后来 bootstrap 再到后来的 backbone angular react。尤其是后来 Single Page App 的兴起导致真正的数据已经不再是 html 而是其背后的 API 了。一方面越发复杂的技术栈确实大大提升了当下的 web 应用的开发效率和使用体验(在有合理投入的前提下)但是这种形式也让搜索引擎以及类似的爬虫更难帮你把你的网页保存下来了。当然市面上还有一些静态网站生成器,比如目前的博客所用的 jekyll ,它依然将数据以静态 html 的形式提供。可惜岁月不饶人,随着 ruby 的热度的下降,至少对我来说 ruby 已经不再是我的核心技术栈了,目前我甚至很难让我自己的网站在本地跑起来了。前一阵子我也甚至在尝试如何将它切换到 hugo 或者 hexo 上去。
第三,不少人的信息都放在了 UGC 社区里,但是这些社区出于商业利益考量,他们的信息不太容易轻易的被倒腾到其他地方,但不少类似的东西也撑不住 10 年,想想开心网、人人网(校内),想想你的 qq 空间。
一些不错的解决方案
然后作者从三个角度去强调如何让自己的 web 信息得以更长远的保存:
- 降低维护成本:使用最原始的 html css 保证信息的基本可访问;别做什么 minify 把自己的 css 和 js 搞成乱码;每个内容最好放在一个完整的页面里,而不是分成多个子页面。
- 排除外部依赖,尽量减少坑队友:自己的图片最好自己维护,别随便就引用外部的;字体用最基本的,用的最多的。
- 对爬虫友好:html 可以更好的把爬虫抓取,当然这个爬虫也可以是你自己写的简单的爬虫;图片尽量压缩,不要占据太多空间,让备份的成本尽可能降低。
基于目前技术栈的解决思路
我觉得需要考虑的一个非常重要的事情就是...你为什么需要考虑 10 年甚至更长的维度的事情?不是说了么,我的兴趣都已经转移了,这东西死活跟我关系不大呀?
我觉得 10 年是个非常长的维度了,再次强调,技术栈的变迁会导致你的维护成本越来越大,所以最终即使有个东西你依然还算是有兴趣,也不想如何的耗费精力了。但如果维护成本不高,写个 10 年 20 年被博客也没什么兴趣不兴趣的吧?
然后作者也提到作为一个科研工作者,很多东西的生命周期越长其所产生的影响力也会越大,并且这种稳定可靠的信息会带给使用者信心,让他们更愿意为其添加引用(想象一下看到一个有 10 年历史的博客的时候,你会不会觉得这人挺靠谱的,居然让这个博客持续了这么久),也许最后就是你觉得的一些没有意义的东西被别人挖掘到了金子呢?
然后这里结合我的经历和目前的技术栈说说我觉得可以做的事情。
我自己的博客到今年也刚好 10 年了,期间有过一次重大的损失发生在 2014 年。在那个年头国内火过一个东西叫做 云引擎(使用体验和 heroku 很像),但是用的是 svn,这个东西的好处就是建站便宜并且自带个域名(毕竟国内域名备案是个很麻烦的事情)。于是我就把自己的 wordpress 博客放到那里了,但是由于自己的疏忽忘记续费了,14 年的博客丢的干干净净。幸好其他博客还有备份避免了全军覆没。后来自己的博客就用 jekyll host 在了 github。 托它的福一直稳定维护至今,但由于目前国内网络对 github page 已经非常不友好了,访问也是时断时续。考虑我博客的主要受众是我,那也就不必在意这么多了。
回顾 10 年,wordpress 所使用的 php 已经逐渐活在了段子里,ruby on rails 也逐渐成为了传说。唯有 html 依然屹立不倒...在未来,如何想要更好的维护自己关注的信息,可以从以下几个方向去考虑:
- 维护一个自己的域名,即使你所依赖的 heroku github digitalocean 都不再适合做你的内容 host 了,你依然可以换一个更合适的地方,然后依然用之前的域名进行访问。
- 使用静态网站生成器生成数据,保证以最原始的方式发布内容。虽然 jekyll 不行了,但是 Gatsby 兴起了,hugo 也还行,迁移成本还算是可以接受。这个思路在其他复杂应用里也会用得到(server-side-render)以提升搜索引擎的抓取效果。
- 类似于 GetPocket 或者是 印象笔记 的工具可以将你的内容保存下来(而不只是链接),算是一个备份吧,即使 html 都没了,文字图片本身也还能得以保留,而且排版还不错。
- 如作者所属,内容和图片最好放在一起,不要因为很多图床非常方便而直接使用。我之前不少的图片就放到了图床,现在看看应该是丢了不少了。以及非必要不使用图片,比如能贴代码的绝不截图。
最后,很多事情是要以更长的时间线去回顾才会发现其中的奥妙,如果连 10 年的记忆都留不下怎么才能温故而知新呢。而且,看看 10 年前自己的东西,也挺有意思呢。


